UI的绘制流程

从setContentView()开始

1
2
3
4
5
@Override
protected void onCreate(Bundle savedInstanceState) {
super.onCreate(savedInstanceState);
setContentView(R.layout.activity_main);
}

1.当我们在ActivityonCreate的setContentView()方法中直接写入布局的ID,来看看这中间经历了什么从而加载到了我们的手机屏幕上。

1
2
3
4
5
6
7
8
9
10
11
12
13
14
15
16
17
18
19
20
21
22
23
24
25
26
27
28
29
30
31
32
33
34
35
36
37
38
39
40
41
42
43
44
45
46
47
48
49
50
51
52
53
54
55
56
Activity中
public void setContentView(View view) {
getWindow().setContentView(view);
initWindowDecorActionBar();
}
public Window getWindow() {
return mWindow;
}
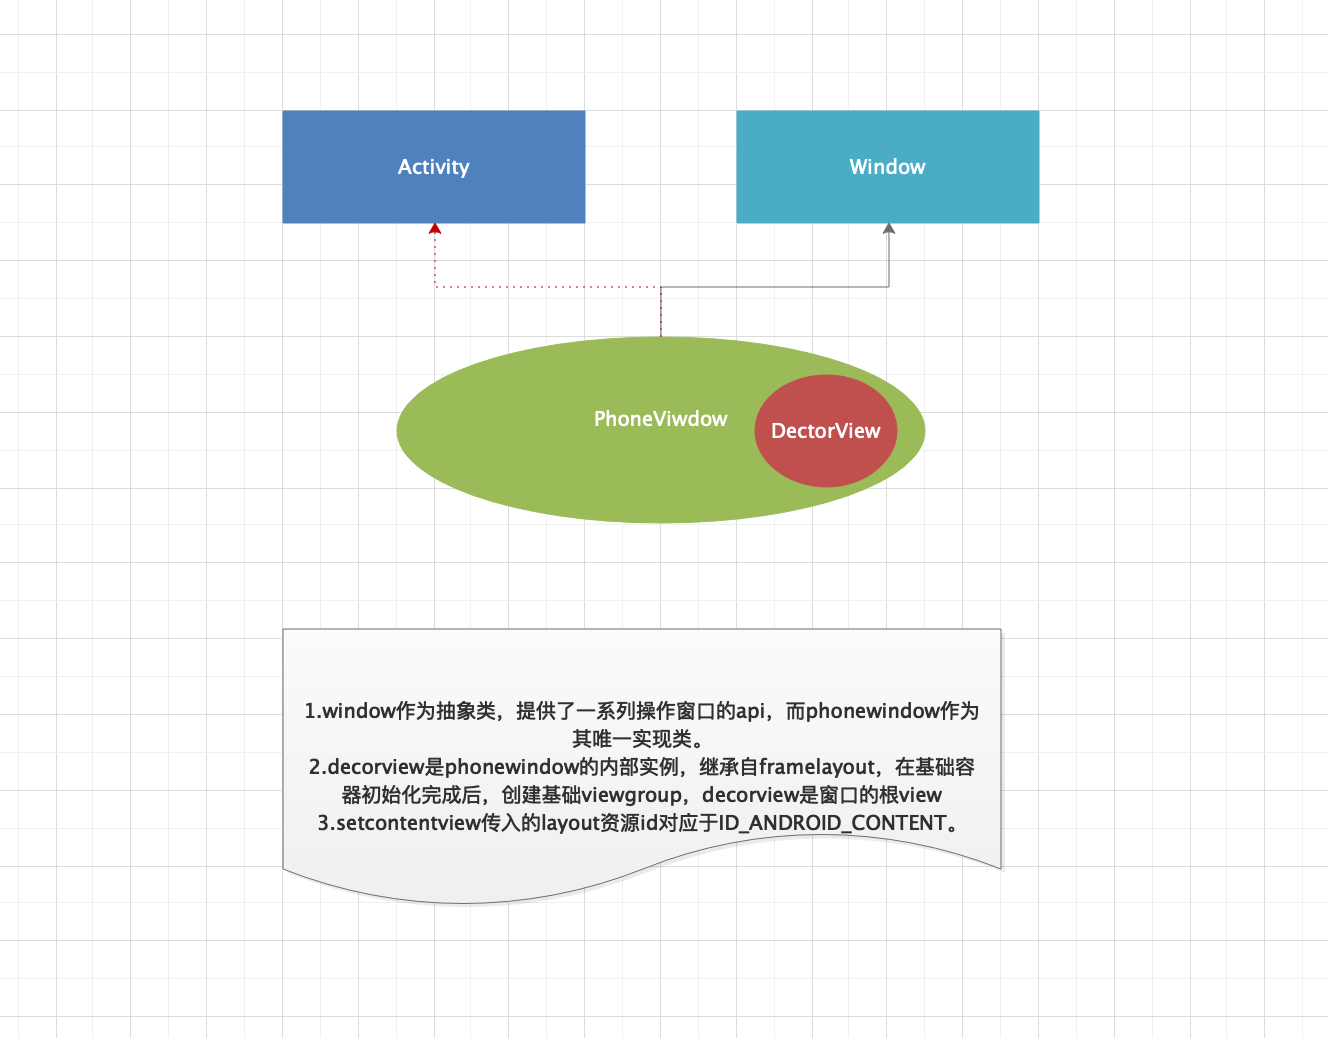
由于Window为抽象类,并且只有唯一实现PhoneWindow,看PhoneWindow中的实现:
@Override
public void setContentView(int layoutResID) {
// Note: FEATURE_CONTENT_TRANSITIONS may be set in the process of installing the window
// decor, when theme attributes and the like are crystalized. Do not check the feature
// before this happens.
if (mContentParent == null) {
//实例化decorview
installDecor();
} else if (!hasFeature(FEATURE_CONTENT_TRANSITIONS)) {
mContentParent.removeAllViews();
}

if (hasFeature(FEATURE_CONTENT_TRANSITIONS)) {
final Scene newScene = Scene.getSceneForLayout(mContentParent, layoutResID,
getContext());
transitionTo(newScene);
} else {
mLayoutInflater.inflate(layoutResID, mContentParent);
}
mContentParent.requestApplyInsets();
final Callback cb = getCallback();
if (cb != null && !isDestroyed()) {
cb.onContentChanged();
}
mContentParentExplicitlySet = true;
}

private void installDecor() {
mForceDecorInstall = false;
if (mDecor == null) {
//实例化了一个dectorview
mDecor = generateDecor(-1);
mDecor.setDescendantFocusability(ViewGroup.FOCUS_AFTER_DESCENDANTS);
mDecor.setIsRootNamespace(true);
if (!mInvalidatePanelMenuPosted && mInvalidatePanelMenuFeatures != 0) {
mDecor.postOnAnimation(mInvalidatePanelMenuRunnable);
}
} else {
mDecor.setWindow(this);
}
if (mContentParent == null) {
//资源的相关的初始化,包括根据开发者使用的一些主题theme
mContentParent = generateLayout(mDecor);
}
......
}
PhoneWindow中的实现比较简单,主要功能就是创建这个decorview,也即顶层view,创建decorview涉及几个重要的方法:generateDecor()、generateLayout()

generateDecor()

1
2
3
4
5
6
7
8
9
10
11
12
13
14
15
16
17
18
19
20
protected DecorView generateDecor(int featureId) {
// System process doesn't have application context and in that case we need to directly use
// the context we have. Otherwise we want the application context, so we don't cling to the
// activity.
Context context;
if (mUseDecorContext) {
Context applicationContext = getContext().getApplicationContext();
if (applicationContext == null) {
context = getContext();
} else {
context = new DecorContext(applicationContext, getContext());
if (mTheme != -1) {
context.setTheme(mTheme);
}
}
} else {
context = getContext();
}
return new DecorView(context, featureId, this, getAttributes());
}

1.方法比较简单,只是对dectorview进行了实例化操作,没有特别需要主要的点。

generateLayout()

1
2
3
4
5
6
7
8
9
10
11
12
13
14
15
16
17
18
19
20
21
22
23
24
25
26
27
28
29
30
31
32
33
34
35
36
37
38
39
40
41
42
43
44
45
46
47
48
49
50
51
52
53
54
55
56
57
58
59
60
61
62
63
64
65
66
67
68
----省略----
int layoutResource;
int features = getLocalFeatures();
// System.out.println("Features: 0x" + Integer.toHexString(features));
if ((features & (1 << FEATURE_SWIPE_TO_DISMISS)) != 0) {
layoutResource = R.layout.screen_swipe_dismiss;
setCloseOnSwipeEnabled(true);
} else if ((features & ((1 << FEATURE_LEFT_ICON) | (1 << FEATURE_RIGHT_ICON))) != 0) {
if (mIsFloating) {
TypedValue res = new TypedValue();
getContext().getTheme().resolveAttribute(
R.attr.dialogTitleIconsDecorLayout, res, true);
layoutResource = res.resourceId;
} else {
layoutResource = R.layout.screen_title_icons;
}
// XXX Remove this once action bar supports these features.
removeFeature(FEATURE_ACTION_BAR);
// System.out.println("Title Icons!");
} else if ((features & ((1 << FEATURE_PROGRESS) | (1 << FEATURE_INDETERMINATE_PROGRESS))) != 0
&& (features & (1 << FEATURE_ACTION_BAR)) == 0) {
// Special case for a window with only a progress bar (and title).
// XXX Need to have a no-title version of embedded windows.
layoutResource = R.layout.screen_progress;
// System.out.println("Progress!");
} else if ((features & (1 << FEATURE_CUSTOM_TITLE)) != 0) {
// Special case for a window with a custom title.
// If the window is floating, we need a dialog layout
if (mIsFloating) {
TypedValue res = new TypedValue();
getContext().getTheme().resolveAttribute(
R.attr.dialogCustomTitleDecorLayout, res, true);
layoutResource = res.resourceId;
} else {
layoutResource = R.layout.screen_custom_title;
}
// XXX Remove this once action bar supports these features.
removeFeature(FEATURE_ACTION_BAR);
} else if ((features & (1 << FEATURE_NO_TITLE)) == 0) {
// If no other features and not embedded, only need a title.
// If the window is floating, we need a dialog layout
if (mIsFloating) {
TypedValue res = new TypedValue();
getContext().getTheme().resolveAttribute(
R.attr.dialogTitleDecorLayout, res, true);
layoutResource = res.resourceId;
} else if ((features & (1 << FEATURE_ACTION_BAR)) != 0) {
layoutResource = a.getResourceId(
R.styleable.Window_windowActionBarFullscreenDecorLayout,
R.layout.screen_action_bar);
} else {
layoutResource = R.layout.screen_title;
}
// System.out.println("Title!");
} else if ((features & (1 << FEATURE_ACTION_MODE_OVERLAY)) != 0) {
layoutResource = R.layout.screen_simple_overlay_action_mode;
} else {
// Embedded, so no decoration is needed.
layoutResource = R.layout.screen_simple;
// System.out.println("Simple!");
}
mDecor.startChanging();
mDecor.onResourcesLoaded(mLayoutInflater, layoutResource);
//ID_ANDROID_CONTENT 重要的参数
ViewGroup contentParent = (ViewGroup)findViewById(ID_ANDROID_CONTENT);
if (contentParent == null) {
throw new RuntimeException("Window couldn't find content container view");
}

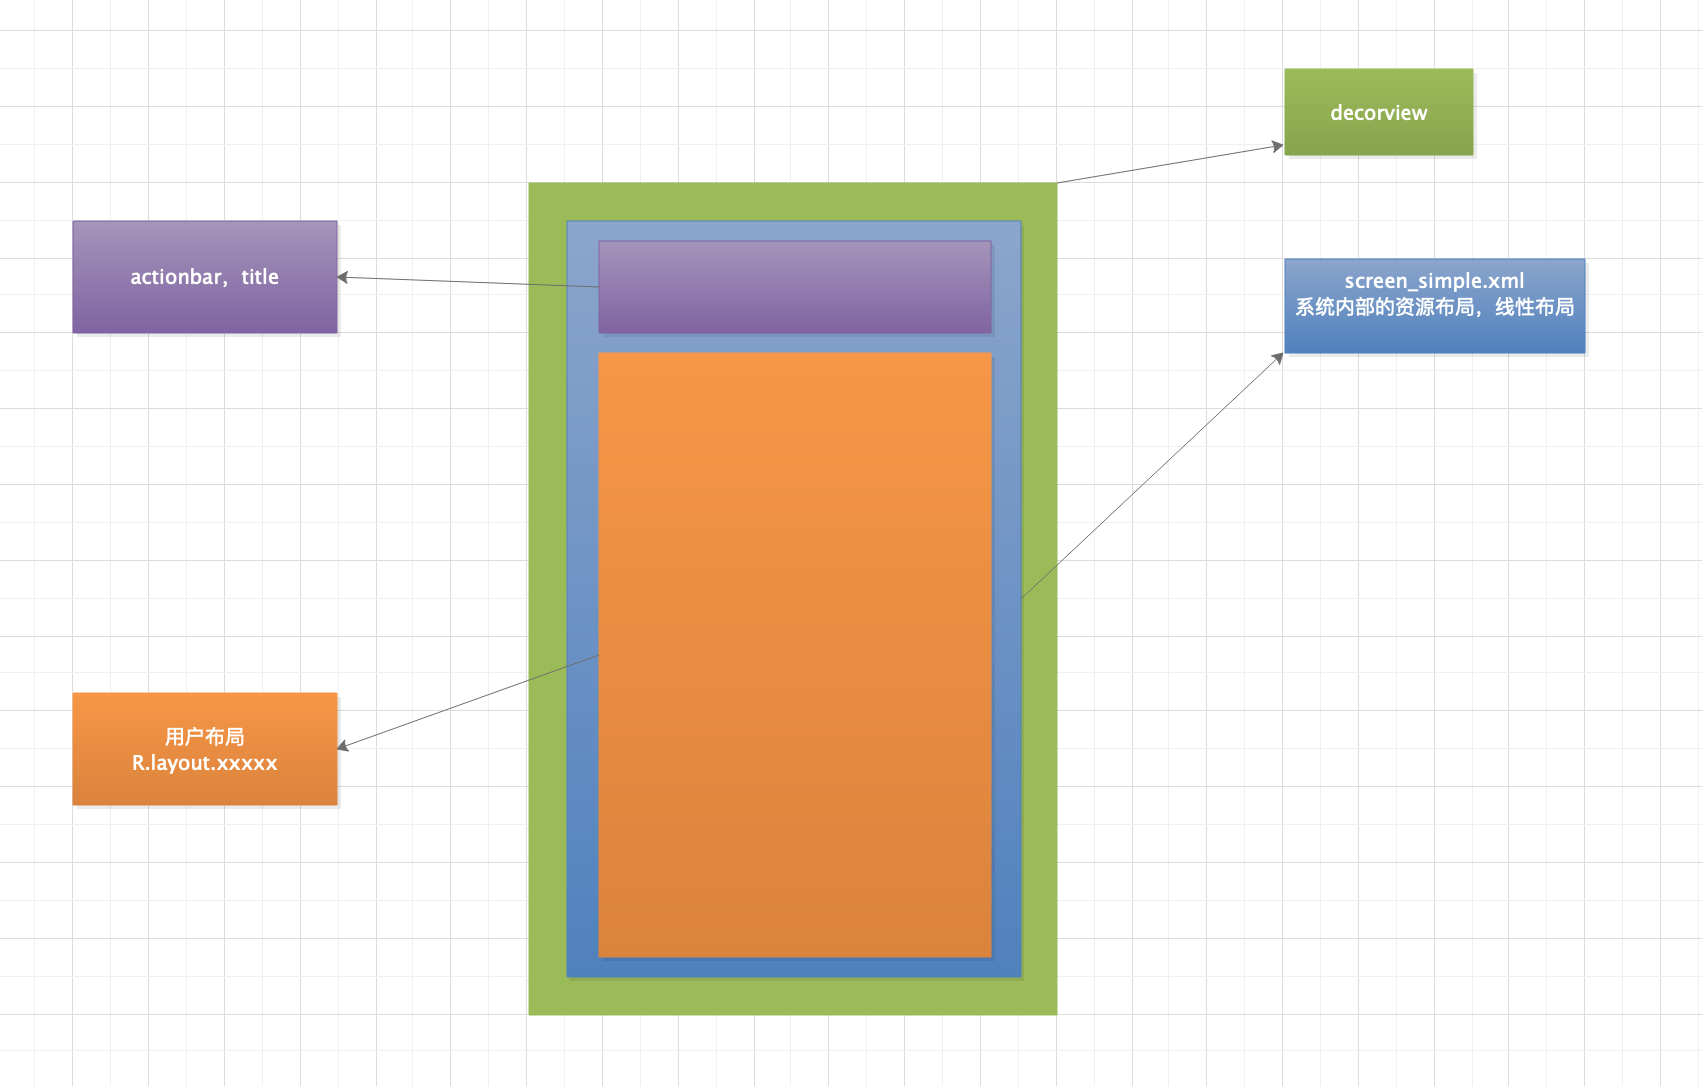
1.layoutResource:定义了一个资源布局,根据不同的主题,加载了不同layout资源文件,当然这属于系统内部的layout,也就是基础容器,不同的theme加载的layout是不同的。而我们还需要的关心的是,我们在设置setContentView(R.layout.xxxx)是如何被加载到屏幕上的。
2.在看ViewGroup contentParent = (ViewGroup)findViewById(ID_ANDROID_CONTENT);之前,注意mDecor.onResourcesLoaded(mLayoutInflater, layoutResource);这个方法,对于基础容器decorview的一系列初始化完成之后,是通过addview,在基础容器创建了一个viewgroup,以便后续将我们自身的布局加载到这个viewgroup中。

1
2
3
4
5
/**
* The ID that the main layout in the XML layout file should have.
*/
//源码解释的很清楚,我们自身的layout资源id映射到系统的对应参数上。
public static final int ID_ANDROID_CONTENT = com.android.internal.R.id.content;

3.以上即view被加载到窗口上的主要过程,主要关系图:
JWBqrn.png
4.视图层级关系图:
JWDEa6.png

ViewRootImpl

1.在ActivityThread中,熟悉源码就会知道,handleResumeActivity是作为绘制的主入口。Window作为ViewRootImpl与Activity之间的桥梁起到了关键的作用。先看主要流程。

handleResumeActivity

1.wm.addView(decor, l); l = LayoutParams,windowManager通过addView将decor与LayoutParams参数关联。而WindowManagerImpl继承自WindowManager

1
2
3
4
5
6
7
WindowManagerImpl中
@Override
public void addView(@NonNull View view, @NonNull ViewGroup.LayoutParams params) {
applyDefaultToken(params);
mGlobal.addView(view, params, mContext.getDisplay(), mParentWindow);
}
mGlobal = WindowManagerGlobal

2.WindowManagerGlobal的addview中对ViewRootImpl作了初始化:

1
2
3
4
5
6
7
8
9
10
11
12
13
14
15
16
17
18
.....
root = new ViewRootImpl(view.getContext(), display);
view.setLayoutParams(wparams);
mViews.add(view);
mRoots.add(root);
mParams.add(wparams);

// do this last because it fires off messages to start doing things
try {
//setView中关键方法requestlayout,就是我们所熟悉的主线程的检查,和scheduleTraversals(),这是进入绘制流程的前期准备工作。
root.setView(view, wparams, panelParentView);
} catch (RuntimeException e) {
// BadTokenException or InvalidDisplayException, clean up.
if (index >= 0) {
removeViewLocked(index, true);
}
throw e;
}

scheduleTraversals()

1
2
3
4
5
6
7
8
9
10
11
12
13
14
15
16
17
18
19
20
21
22
23
24
25
26
27
28
29
30
31
32
33
34
35
36
37
38
39
40
41
42
43
44
45
void scheduleTraversals() {
if (!mTraversalScheduled) {
mTraversalScheduled = true;
//还是handler消息机制,不过这里使用了同步屏障,同步屏障对同步方法有影响,对异步无效果,当handler接收到打上同步屏障的消息时,会暂停其他消息,优先处理此消息
//目的也很明确--->优先处理ui绘制
mTraversalBarrier = mHandler.getLooper().getQueue().postSyncBarrier();
//mTraversalRunnable实现了runnable接口
mChoreographer.postCallback(
Choreographer.CALLBACK_TRAVERSAL, mTraversalRunnable, null);
if (!mUnbufferedInputDispatch) {
scheduleConsumeBatchedInput();
}
notifyRendererOfFramePending();
pokeDrawLockIfNeeded();
}
}

//
final TraversalRunnable mTraversalRunnable = new TraversalRunnable();

final class TraversalRunnable implements Runnable {
@Override
public void run() {
doTraversal();
}
}

void doTraversal() {
if (mTraversalScheduled) {
mTraversalScheduled = false;
//移除同步屏障,其他同步方法得以继续执行
mHandler.getLooper().getQueue().removeSyncBarrier(mTraversalBarrier);

if (mProfile) {
Debug.startMethodTracing("ViewAncestor");
}
//从这里开始真正进入view的绘制流程
performTraversals();

if (mProfile) {
Debug.stopMethodTracing();
mProfile = false;
}
}
}

小结

1
2
3
4
5
6
7
8
9
10
11
1.经过分析得出,View绘制的前期工作流程很清晰:
ActivityThread.handleResumeActivity()-->
[WindowManager.addView()]WindowManagerImpl.addView()-->
WindowManagerGlobal.addView()-->
ViewRootImpl.addview()-->
ViewRootImpl.setView()-->
ViewRootImpl.requestLayout()-->
ViewRootImpl.scheduleTraversals()-->
ViewRootImpl.doTraversal()-->
ViewRootImpl.performTraversals()-->
开始view的绘制流程。
1
2
3
4
5
6
7
8
9
10
11
12
13
14
2.进一步划分,绘制入口:
ActivityThread.handleResumeActivity()、
[WindowManager.addView()]WindowManagerImpl.addView()、
WindowManagerGlobal.addView()、ViewRootImpl.addview()。
绘制的类及相关方法:
ViewRootImpl.setView()、
ViewRootImpl.requestLayout()、
ViewRootImpl.scheduleTraversals()、
ViewRootImpl.doTraversal()、
ViewRootImpl.performTraversals()。
绘制的步骤:
ViewRootImpl.performMeasure()、
ViewRootImpl.performLayout()、
ViewRootImpl.performDraw()。

measure()

1
2
3
4
5
6
7
8
9
10
11
12
13
14
15
16
17
18
19
20
21
22
23
24
25
26
27
28
ViewRootImpl
private void performMeasure(int childWidthMeasureSpec, int childHeightMeasureSpec) {
if (mView == null) {
return;
}
Trace.traceBegin(Trace.TRACE_TAG_VIEW, "measure");
try {
//mView也就是decorview,而decorview继承了framelayout,在measure方法调用了 onMeasure(widthMeasureSpec, heightMeasureSpec);
//继续看framelayout中的onMeasure方法
mView.measure(childWidthMeasureSpec, childHeightMeasureSpec);
} finally {
Trace.traceEnd(Trace.TRACE_TAG_VIEW);
}
}

....
if (cacheIndex < 0 || sIgnoreMeasureCache) {
// measure ourselves, this should set the measured dimension flag back
//测量自身,确定大小保存并返回,由于decorview属于容器布局,因此查看framelayout中的相关方法onMeasure
onMeasure(widthMeasureSpec, heightMeasureSpec);
mPrivateFlags3 &= ~PFLAG3_MEASURE_NEEDED_BEFORE_LAYOUT;
} else {
long value = mMeasureCache.valueAt(cacheIndex);
// Casting a long to int drops the high 32 bits, no mask needed
setMeasuredDimensionRaw((int) (value >> 32), (int) value);
mPrivateFlags3 |= PFLAG3_MEASURE_NEEDED_BEFORE_LAYOUT;
}
....

先看MeasureSpec源码中解释:

1
2
3
4
5
6
7
8
9
10
11
12
13
14
15
16
17
18
19
20
21
22
23
24
25
26
27
28
29
30
31
32
33
34
35
36
37
38
39
40
41
42
43
44
45
46
47
48
49
50
51
52
53
54
55
56
57
58
59
60
61
62
63
64
65
66
67
68
69
70
71
72
73
74
75
76
77
78
79
80
81
82
83
84
85
/*
* MeasureSpecs are implemented as ints to reduce object allocation. This class
* is provided to pack and unpack the &lt;size, mode&gt; tuple into the int.
*/
public static class MeasureSpec {
private static final int MODE_SHIFT = 30;
private static final int MODE_MASK = 0x3 << MODE_SHIFT;
/** @hide */
@IntDef({UNSPECIFIED, EXACTLY, AT_MOST})
@Retention(RetentionPolicy.SOURCE)
public @interface MeasureSpecMode {}
/**
* Measure specification mode: The parent has not imposed any constraint
* on the child. It can be whatever size it wants.
*/
public static final int UNSPECIFIED = 0 << MODE_SHIFT;
/**
* Measure specification mode: The parent has determined an exact size
* for the child. The child is going to be given those bounds regardless
* of how big it wants to be.
*/
public static final int EXACTLY = 1 << MODE_SHIFT;
/**
* Measure specification mode: The child can be as large as it wants up
* to the specified size.
*/
public static final int AT_MOST = 2 << MODE_SHIFT;

public static int makeMeasureSpec(@IntRange(from = 0, to = (1 << MeasureSpec.MODE_SHIFT) - 1) int size,
@MeasureSpecMode int mode) {
if (sUseBrokenMakeMeasureSpec) {
return size + mode;
} else {
return (size & ~MODE_MASK) | (mode & MODE_MASK);
}
}
@UnsupportedAppUsage
public static int makeSafeMeasureSpec(int size, int mode) {
if (sUseZeroUnspecifiedMeasureSpec && mode == UNSPECIFIED) {
return 0;
}
return makeMeasureSpec(size, mode);
}
@MeasureSpecMode
public static int getMode(int measureSpec) {
//noinspection ResourceType
return (measureSpec & MODE_MASK);
}
public static int getSize(int measureSpec) {
return (measureSpec & ~MODE_MASK);
}

static int adjust(int measureSpec, int delta) {
final int mode = getMode(measureSpec);
int size = getSize(measureSpec);
if (mode == UNSPECIFIED) {
// No need to adjust size for UNSPECIFIED mode.
return makeMeasureSpec(size, UNSPECIFIED);
}
size += delta;
if (size < 0) {
Log.e(VIEW_LOG_TAG, "MeasureSpec.adjust: new size would be negative! (" + size +
") spec: " + toString(measureSpec) + " delta: " + delta);
size = 0;
}
return makeMeasureSpec(size, mode);
}
public static String toString(int measureSpec) {
int mode = getMode(measureSpec);
int size = getSize(measureSpec);

StringBuilder sb = new StringBuilder("MeasureSpec: ");
if (mode == UNSPECIFIED)
sb.append("UNSPECIFIED ");
else if (mode == EXACTLY)
sb.append("EXACTLY ");
else if (mode == AT_MOST)
sb.append("AT_MOST ");
else
sb.append(mode).append(" ");

sb.append(size);
return sb.toString();
}
}

1.MeasureSpec定义了三种模式UNSPECIFIED、EXACTLY、EXACTLY,也就是我们平时使用的WRAP_CONTENT、MATCH_PARENT、dp、px,将mode与size打包保存在MeasureSpec中。由于int有32位,取前两位作为mode,而后30位作为size。
2.Framelayout中的onMeasure方法:

1
2
3
4
5
6
7
8
9
10
11
12
13
14
15
16
17
18
19
20
21
22
23
24
25
26
27
28
29
30
31
32
33
34
35
36
37
38
39
40
41
42
43
44
45
46
47
48
49
50
51
52
53
54
55
56
57
58
59
60
61
62
63
64
65
66
67
68
69
70
71
72
73
74
75
76
77
78
79
80
81
82
83
84
85
86
87
88
89
90
91
92
93
94
95
96
97
98
99
100
101
102
103
104
105
106
107
108
109
110
111
112
113
114
115
116
117
118
119
120
121
122
123
124
125
126
127
128
129
130
131
132
133
134
135
136
137
138
@Override
protected void onMeasure(int widthMeasureSpec, int heightMeasureSpec) {
//容器类的view测量,都需要层层遍历子view
int count = getChildCount();

final boolean measureMatchParentChildren =
MeasureSpec.getMode(widthMeasureSpec) != MeasureSpec.EXACTLY ||
MeasureSpec.getMode(heightMeasureSpec) != MeasureSpec.EXACTLY;
mMatchParentChildren.clear();

int maxHeight = 0;
int maxWidth = 0;
int childState = 0;

for (int i = 0; i < count; i++) {
final View child = getChildAt(i);
if (mMeasureAllChildren || child.getVisibility() != GONE) {
measureChildWithMargins(child, widthMeasureSpec, 0, heightMeasureSpec, 0);
final LayoutParams lp = (LayoutParams) child.getLayoutParams();
maxWidth = Math.max(maxWidth,
child.getMeasuredWidth() + lp.leftMargin + lp.rightMargin);
maxHeight = Math.max(maxHeight,
child.getMeasuredHeight() + lp.topMargin + lp.bottomMargin);
childState = combineMeasuredStates(childState, child.getMeasuredState());
if (measureMatchParentChildren) {
if (lp.width == LayoutParams.MATCH_PARENT ||
lp.height == LayoutParams.MATCH_PARENT) {
mMatchParentChildren.add(child);
}
}
}
}
// Account for padding too
maxWidth += getPaddingLeftWithForeground() + getPaddingRightWithForeground();
maxHeight += getPaddingTopWithForeground() + getPaddingBottomWithForeground();
// Check against our minimum height and width

//测量子view后的最大宽高,包含了margin的值,padding,以及子view是否设置的最小宽高
maxHeight = Math.max(maxHeight, getSuggestedMinimumHeight());
maxWidth = Math.max(maxWidth, getSuggestedMinimumWidth());

// Check against our foreground's minimum height and width
final Drawable drawable = getForeground();
if (drawable != null) {
maxHeight = Math.max(maxHeight, drawable.getMinimumHeight());
maxWidth = Math.max(maxWidth, drawable.getMinimumWidth());
}
//测量子控件完成后,决定自身的宽高(ViewGroup),并保存
setMeasuredDimension(resolveSizeAndState(maxWidth, widthMeasureSpec, childState),
resolveSizeAndState(maxHeight, heightMeasureSpec,
childState << MEASURED_HEIGHT_STATE_SHIFT));

count = mMatchParentChildren.size();
if (count > 1) {
for (int i = 0; i < count; i++) {
final View child = mMatchParentChildren.get(i);
final MarginLayoutParams lp = (MarginLayoutParams) child.getLayoutParams();

final int childWidthMeasureSpec;
if (lp.width == LayoutParams.MATCH_PARENT) {
final int width = Math.max(0, getMeasuredWidth()
- getPaddingLeftWithForeground() - getPaddingRightWithForeground()
- lp.leftMargin - lp.rightMargin);
childWidthMeasureSpec = MeasureSpec.makeMeasureSpec(
width, MeasureSpec.EXACTLY);
} else {
childWidthMeasureSpec = getChildMeasureSpec(widthMeasureSpec,
getPaddingLeftWithForeground() + getPaddingRightWithForeground() +
lp.leftMargin + lp.rightMargin,
lp.width);
}
final int childHeightMeasureSpec;
if (lp.height == LayoutParams.MATCH_PARENT) {
final int height = Math.max(0, getMeasuredHeight()
- getPaddingTopWithForeground() - getPaddingBottomWithForeground()
- lp.topMargin - lp.bottomMargin);
childHeightMeasureSpec = MeasureSpec.makeMeasureSpec(
height, MeasureSpec.EXACTLY);
} else {
childHeightMeasureSpec = getChildMeasureSpec(heightMeasureSpec,
getPaddingTopWithForeground() + getPaddingBottomWithForeground() +
lp.topMargin + lp.bottomMargin,
lp.height);
}
//走到这里还是调用measure方法,也即递归操作,对于子view如果是viewgroup还是走一遍以上的逻辑,直到全部测量完成,在我们实际开发过程中,可想而知如果view的层级过深,是不利于性能的。因为测量是一个递归遍历操作。
child.measure(childWidthMeasureSpec, childHeightMeasureSpec);
}
}
}

View中:
/**
* <p>This method must be called by {@link #onMeasure(int, int)} to store the
* measured width and measured height. Failing to do so will trigger an
* exception at measurement time.</p>
*
* @param measuredWidth The measured width of this view. May be a complex
* bit mask as defined by {@link #MEASURED_SIZE_MASK} and
* {@link #MEASURED_STATE_TOO_SMALL}.
* @param measuredHeight The measured height of this view. May be a complex
* bit mask as defined by {@link #MEASURED_SIZE_MASK} and
* {@link #MEASURED_STATE_TOO_SMALL}.
*/

protected void onMeasure(int widthMeasureSpec, int heightMeasureSpec) {
setMeasuredDimension(getDefaultSize(getSuggestedMinimumWidth(), widthMeasureSpec),
getDefaultSize(getSuggestedMinimumHeight(), heightMeasureSpec));
}
protected final void setMeasuredDimension(int measuredWidth, int measuredHeight) {
boolean optical = isLayoutModeOptical(this);
if (optical != isLayoutModeOptical(mParent)) {
Insets insets = getOpticalInsets();
int opticalWidth = insets.left + insets.right;
int opticalHeight = insets.top + insets.bottom;

measuredWidth += optical ? opticalWidth : -opticalWidth;
measuredHeight += optical ? opticalHeight : -opticalHeight;
}
setMeasuredDimensionRaw(measuredWidth, measuredHeight);
}

public static int getDefaultSize(int size, int measureSpec) {
int result = size;
int specMode = MeasureSpec.getMode(measureSpec);
int specSize = MeasureSpec.getSize(measureSpec);

switch (specMode) {
case MeasureSpec.UNSPECIFIED:
result = size;
break;
////当我们自定义view时,可见如果不在onmeasure重写,决定自己的宽高,那么设置matchparent与wrapcontent效果是一样的。
case MeasureSpec.AT_MOST:
case MeasureSpec.EXACTLY:
result = specSize;
break;
}
return result;
}

layout()

1
2
3
4
5
6
7
8
9
10
11
12
13
14
15
16
17
18
19
20
21
22
23
24
25
26
27
28
29
30
31
32
33
34
35
36
37
38
39
40
41
42
43
44
45
46
47
48
49
50
51
52
53
54
55
56
57
58
59
60
61
62
63
64
65
66
67
68
69
70
71
72
73
74
75
76
77
78
79
80
81
82
//确定了自身的上下左右的位置
public void layout(int l, int t, int r, int b) {
if ((mPrivateFlags3 & PFLAG3_MEASURE_NEEDED_BEFORE_LAYOUT) != 0) {
onMeasure(mOldWidthMeasureSpec, mOldHeightMeasureSpec);
mPrivateFlags3 &= ~PFLAG3_MEASURE_NEEDED_BEFORE_LAYOUT;
}
int oldL = mLeft;
int oldT = mTop;
int oldB = mBottom;
int oldR = mRight;

boolean changed = isLayoutModeOptical(mParent) ?
setOpticalFrame(l, t, r, b) : setFrame(l, t, r, b);

if (changed || (mPrivateFlags & PFLAG_LAYOUT_REQUIRED) == PFLAG_LAYOUT_REQUIRED) {
onLayout(changed, l, t, r, b);

if (shouldDrawRoundScrollbar()) {
if(mRoundScrollbarRenderer == null) {
mRoundScrollbarRenderer = new RoundScrollbarRenderer(this);
}
} else {
mRoundScrollbarRenderer = null;
}
mPrivateFlags &= ~PFLAG_LAYOUT_REQUIRED;
ListenerInfo li = mListenerInfo;
if (li != null && li.mOnLayoutChangeListeners != null) {
ArrayList<OnLayoutChangeListener> listenersCopy =
(ArrayList<OnLayoutChangeListener>)li.mOnLayoutChangeListeners.clone();
int numListeners = listenersCopy.size();
for (int i = 0; i < numListeners; ++i) {
listenersCopy.get(i).onLayoutChange(this, l, t, r, b, oldL, oldT, oldR, oldB);
}
}
}
final boolean wasLayoutValid = isLayoutValid();

mPrivateFlags &= ~PFLAG_FORCE_LAYOUT;
mPrivateFlags3 |= PFLAG3_IS_LAID_OUT;

if (!wasLayoutValid && isFocused()) {
mPrivateFlags &= ~PFLAG_WANTS_FOCUS;
if (canTakeFocus()) {
// We have a robust focus, so parents should no longer be wanting focus.
clearParentsWantFocus();
} else if (getViewRootImpl() == null || !getViewRootImpl().isInLayout()) {
// This is a weird case. Most-likely the user, rather than ViewRootImpl, called
// layout. In this case, there's no guarantee that parent layouts will be evaluated
// and thus the safest action is to clear focus here.
clearFocusInternal(null, /* propagate */ true, /* refocus */ false);
clearParentsWantFocus();
} else if (!hasParentWantsFocus()) {
// original requestFocus was likely on this view directly, so just clear focus
clearFocusInternal(null, /* propagate */ true, /* refocus */ false);
}
// otherwise, we let parents handle re-assigning focus during their layout passes.
} else if ((mPrivateFlags & PFLAG_WANTS_FOCUS) != 0) {
mPrivateFlags &= ~PFLAG_WANTS_FOCUS;
View focused = findFocus();
if (focused != null) {
// Try to restore focus as close as possible to our starting focus.
if (!restoreDefaultFocus() && !hasParentWantsFocus()) {
// Give up and clear focus once we've reached the top-most parent which wants
// focus.
focused.clearFocusInternal(null, /* propagate */ true, /* refocus */ false);
}
}
}
if ((mPrivateFlags3 & PFLAG3_NOTIFY_AUTOFILL_ENTER_ON_LAYOUT) != 0) {
mPrivateFlags3 &= ~PFLAG3_NOTIFY_AUTOFILL_ENTER_ON_LAYOUT;
notifyEnterOrExitForAutoFillIfNeeded(true);
}
}
//onLayout方法默认是空实现,如果是容器view则需要重写此方法,摆放子view的位置,如果是普通view即不实现
protected void onLayout(boolean changed, int left, int top, int right, int bottom) {

}
在framelayout中:
@Override
protected void onLayout(boolean changed, int left, int top, int right, int bottom) {
layoutChildren(left, top, right, bottom, false /* no force left gravity */);
}
1
2
1.view的布局比较简单,调用view.layout(),确定left、right、top、bottom的值,也即确定自身的位置。
2.layout()方法的内调用了onLayout()方法。onLayout()默认是空实现,而对于viewgroup需要重写确定子view的位置。

draw()

1
2
3
4
5
6
7
8
9
10
11
12
13
14
15
16
绘制方法相对比较简单
/*
* Draw traversal performs several drawing steps which must be executed
* in the appropriate order:
*
* 1. Draw the background
* 2. If necessary, save the canvas' layers to prepare for fading
* 3. Draw view's content
* 4. Draw children
* 5. If necessary, draw the fading edges and restore layers
* 6. Draw decorations (scrollbars for instance)
*/
1.绘制背景drabackground
2.绘制自身ondraw
3.绘制子view,dispatchDraw
4.绘制滚动条等装饰
这个功能是摆设,看看就好~~~